Dress Up Your Rooms with Decorative Ceiling Medallions

How to Select and Install Ceiling Medallions for a Stunning Finish
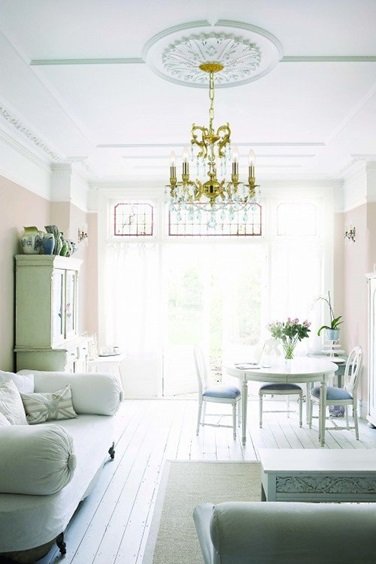
Adding decorative ceiling medallions is a great way to enhance your favorite spaces, serving as a stylish focal point around light fixtures or ceiling fans. Once made from heavy plaster, modern ceiling medallions are now crafted from wood or lightweight polyurethane or resin, making them easier to install and more affordable. Available in a variety of sizes, shapes, and designs, ceiling medallions can complement any décor, from classic Victorian styles to sleek contemporary looks.
Why Choose a Ceiling Medallion?
Ceiling medallions add elegance and architectural interest to your home. They can highlight a beautiful light fixture and bring character and depth to plain ceilings. Since today's medallions are made from lightweight materials like polyurethane, they're simple to install and can be painted, stenciled, or antiqued to match any interior. Sizes range from small 4-inch medallions to grand 72-inch designs, allowing for versatile use in various room types.
Benefits of Modern Ceiling Medallions
- Lightweight and Easy to Handle: Urethane and resin are much lighter than traditional plaster, simplifying the installation process.
- Cost-Effective: Modern materials make these decorative elements more affordable.
- Customizable Finishes: Easily paintable or stainable for a personalized look.
- Variety of Designs: From simple and understated to intricate Victorian styles, there’s a medallion for every taste.
How to Install Ceiling Medallions: Step-by-Step Guide
Follow these instructions to install a ceiling medallion and transform your space in just a few steps.

CEILING MEDALLIONS
Step 1: Prepare the Ceiling
Before starting, ensure the power to the light fixture is turned off at the breaker box. Remove the existing light fixture, taking care not to damage the ceiling. Use a putty knife to scrape away any old caulk or chipped paint. Clean the area around the ceiling box with a mild soap solution to remove dust and grease.

Step 2: Measure and Mark the Medallion for Cutting
If your medallion doesn’t come with a pre-cut center hole, you’ll need to make one. Place the light fixture’s decorative canopy on the front of the medallion to determine the center and trace a circle around the edge of the canopy. Measure about 1/2 inch inside the traced circle, then use a compass to draw a smaller circle.

Step 3: Cut the Center Hole
Use a spiral saw, jigsaw, or a fine-toothed hand saw to carefully cut along the marked inner circle. This will create an opening for the light fixture’s wiring and mounting hardware.

Step 4: Test for Fit
Hold the medallion up to the ceiling, aligning the cut hole with the electrical box to ensure a proper fit. Make sure you can easily access the wires and mounting holes. Now is also a good time to paint or finish the medallion if you plan to customize its appearance.
Step 5: Install the Medallion
Apply a generous bead of adhesive caulk to the back of the medallion.
Center the medallion over the electrical box and press it firmly into place on the ceiling.
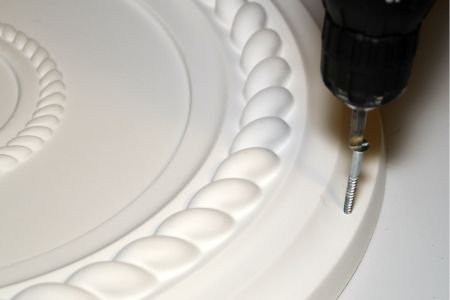
While the adhesive sets, secure the medallion with trim-head screws, driving them through the medallion into the ceiling joists for added support.
Use caulk or wood filler to cover the screw heads, and once dry, sand the spots smooth. Touch up the medallion with paint if needed.
Step 6: Reinstall the Light Fixture
Once the medallion is securely in place, reconnect the wiring and mount the light fixture according to the manufacturer’s instructions. Turn the power back on at the breaker box and enjoy your newly upgraded space.
Tips for Choosing the Right Ceiling Medallion
When selecting a ceiling medallion, consider the following factors to achieve the best look:
Size: For a subtle accent, choose a medallion that’s about the same diameter as the light fixture. For a bolder look, opt for a medallion that’s larger than the fixture.
Design Style: Match the medallion’s design with the style of your room. Ornate designs work well in traditional spaces, while simpler styles suit modern interiors.
Ceiling Height: Larger medallions are ideal for high ceilings, as they draw the eye upward. For lower ceilings, a smaller medallion will provide a more balanced look.
Van Dyke’s Restorers offers a wide range of ceiling medallions, including options from the Restorers Architectural line, which features historically inspired designs crafted from lightweight polyurethane. Each medallion is fully primed and ready for paint, allowing you to customize it to fit your decor perfectly.
Decorative ceiling medallions are an easy and affordable way to add elegance to any room. With a variety of styles and installation options, you can find the perfect medallion to match your design vision and transform your ceiling into a work of art.